


I’ve always been interested in different ciphers and puzzles. Breaking the puzzle or following the code-breaking process in a Sherlock Holmes story or Dan Brown’s Da Vinci Code is fascinating. Even the history of data encryption is interesting and I recommend studying the classic ciphers, such as Caesar Cipher from ancient Rome. Of course, traditional ciphers from the pen-and-paper era are much simpler than modern computer-era algorithms, where you have the computer chip’s calculation power to scramble the message. In this article, I will demonstrate in practice how modern cloud-era encryption with AWS Key Management Service, or KMS, works.
Key terminology
First, some terminology, what is encryption? It takes unencrypted data, called plaintext, and performs an algorithmic cipher function with a secret value called the key to create a piece of encrypted ciphertext. KMS works exactly like this, and that’s why I think the name Key Management Service is somewhat misleading; KMS is actually a data encryption service. The name comes from the various options you have with the encryption key management compared to the leave-it-to-AWS mentality with other encryption alternatives, but the key management is a topic for an own article.
I would describe the KMS key as a logical container for the actual encryption key, also called key material. The container also contains other metadata such as key policy - the permissions for the key usage, deletion and rotation policy, etc. This article concentrates on the core encryption functionality - the key material and actual encryption and decryption commands. Steps we will take:
- We will create a KMS key, the container, to hold our custom key material
- We will generate random key material with OpenSSL on your own machine, outside of AWS
- We import the key material to the KMS key
- We use our newly created key to encrypt and decrypt data
- We go through the concept of data keys and envelope encryption, and encrypt and decrypt data with a data key
Prerequisites
I’m using my Mac laptop with a Z shell terminal, so you might need to adjust the tooling for your operating system. The following is required:
- AWS account created; I use the eu-west-1 region (Ireland) in demonstrations, but you can select something closer to you.
- AWS CLI tools installed and credentials configured for your AWS account.
- OpenSSL installed. It’s used for generating the plaintext encryption key material and decrypting the key material with AWS offered public key. OpenSSL is also used for encrypting data with KMS-generated data keys.
- Base64 command line tool installed to decode the AWS CLI responses.
Create a KMS key with custom key material
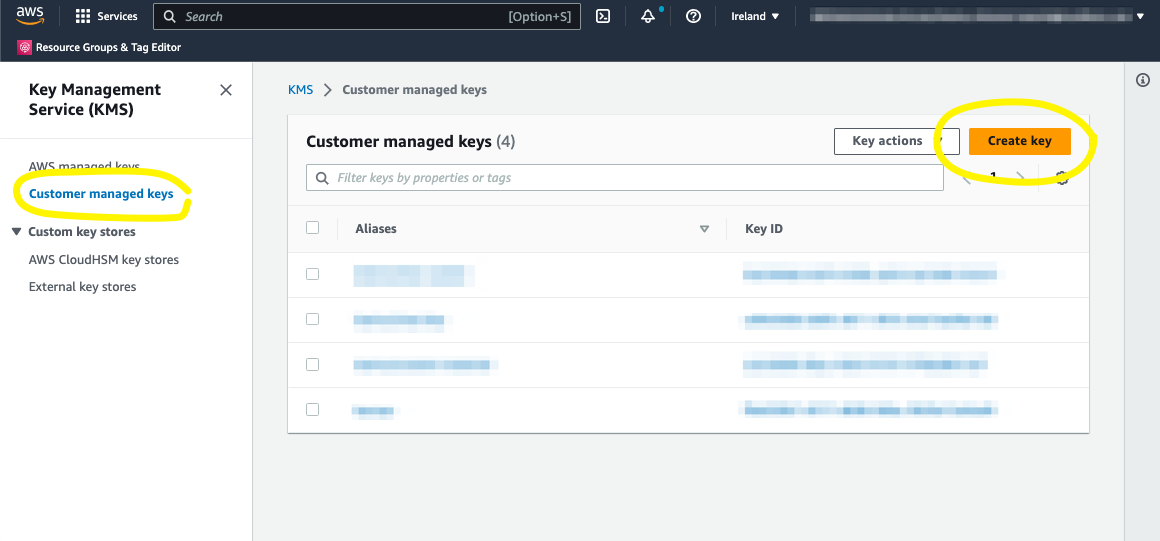
Go to KMS service in AWS Console and select “Customer managed keys” from the left, which is the section for your own keys (“AWS managed keys” is for keys created by AWS when you select an AWS managed option with different services). From the top right corner, press the “Create key” button.
Create a KMS key with custom key material
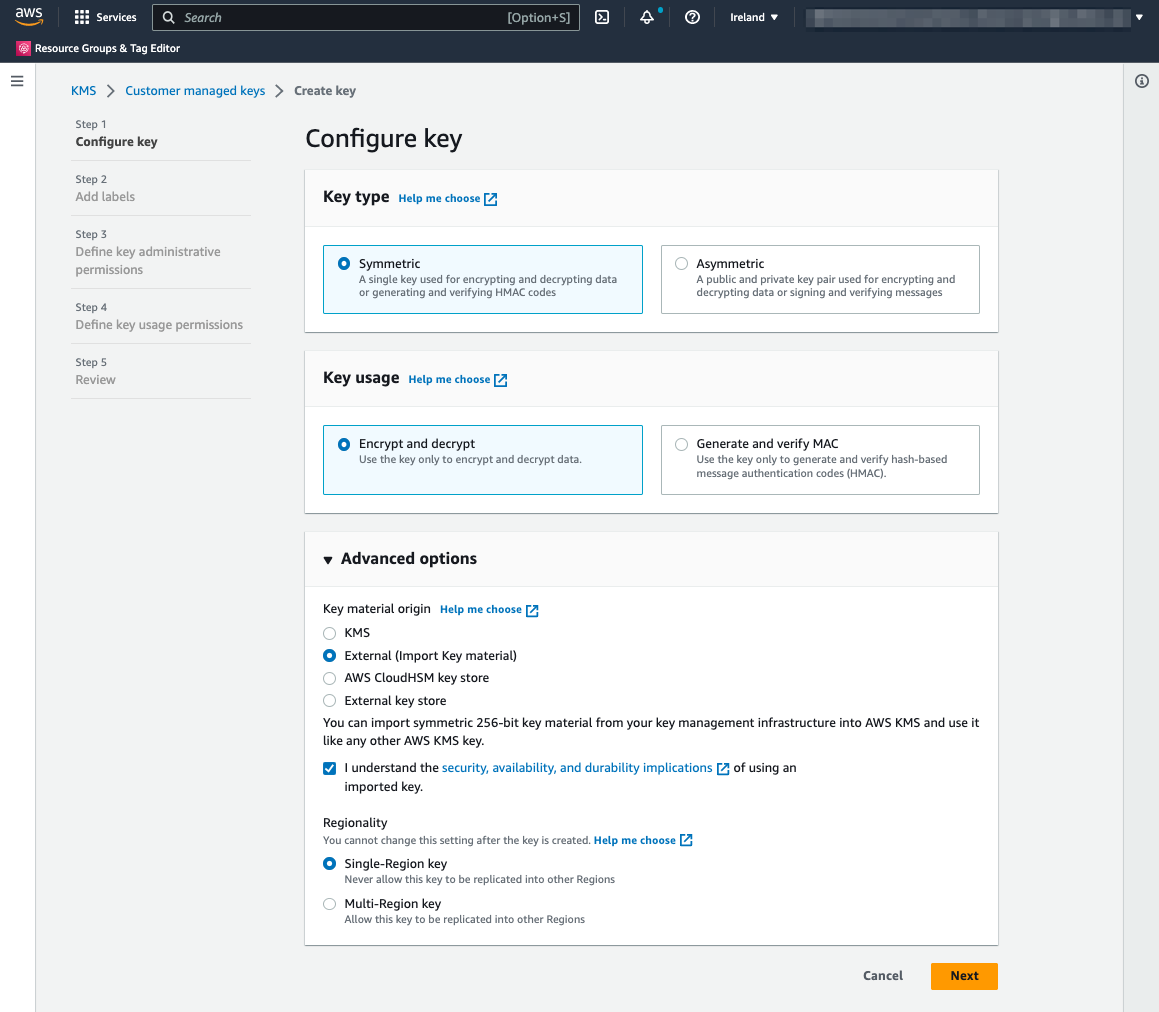
Step 1. Configure Key
Choose “Symmetric” for a key type (same key used for encryption and decryption) and “Encrypt and decrypt” for key usage. Extend “Advanced options” and select:
- Key material origin: External (Import Key material)
- Check “I understand the security, availability, and durability implications of using an imported key.” (I recommend checking the link provided for your responsibilities with the imported key material).
- Regionality: Single-Region key
Press the “Next” button in the lower right corner.
Configure key
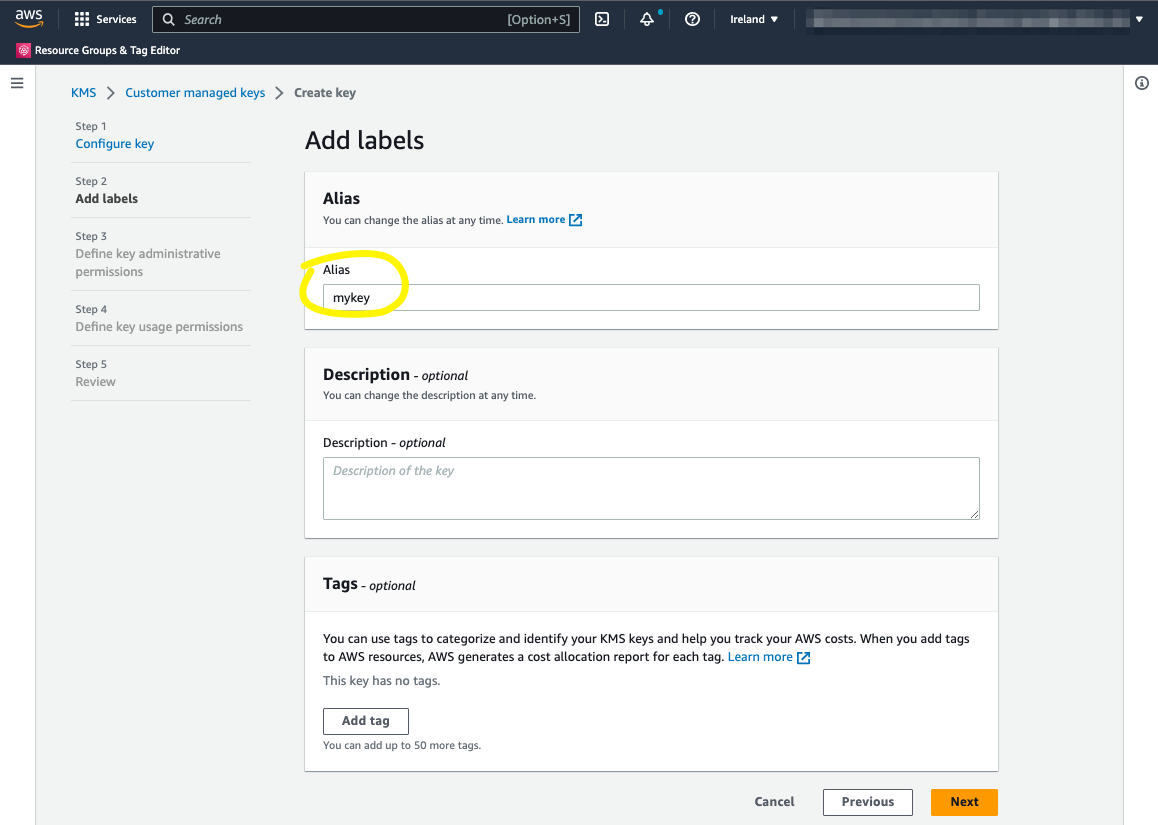
Step 2. Add labels
We are using an alias to reference our key instead of the Amazon resource name, the ARN, of the KMS key. So add alias “mykey” to the key. Leave other fields as default and press the “Next” button in the lower right corner.
Add an alias to the key
Step 3. Define key administrative permission
Leave everything as default and press the “Next” button in the lower right corner.
Note: This is for demonstration purposes only! The default policy allows the key usage for everyone inside the AWS account, so this is not a production recommendation.
Step 4. Define key usage permissions
Leave everything as default and press the “Next” button in the lower right corner.
Step 5. Review
Press the “Next” button in the lower right corner.
Step 6. Download the wrapping key and import token
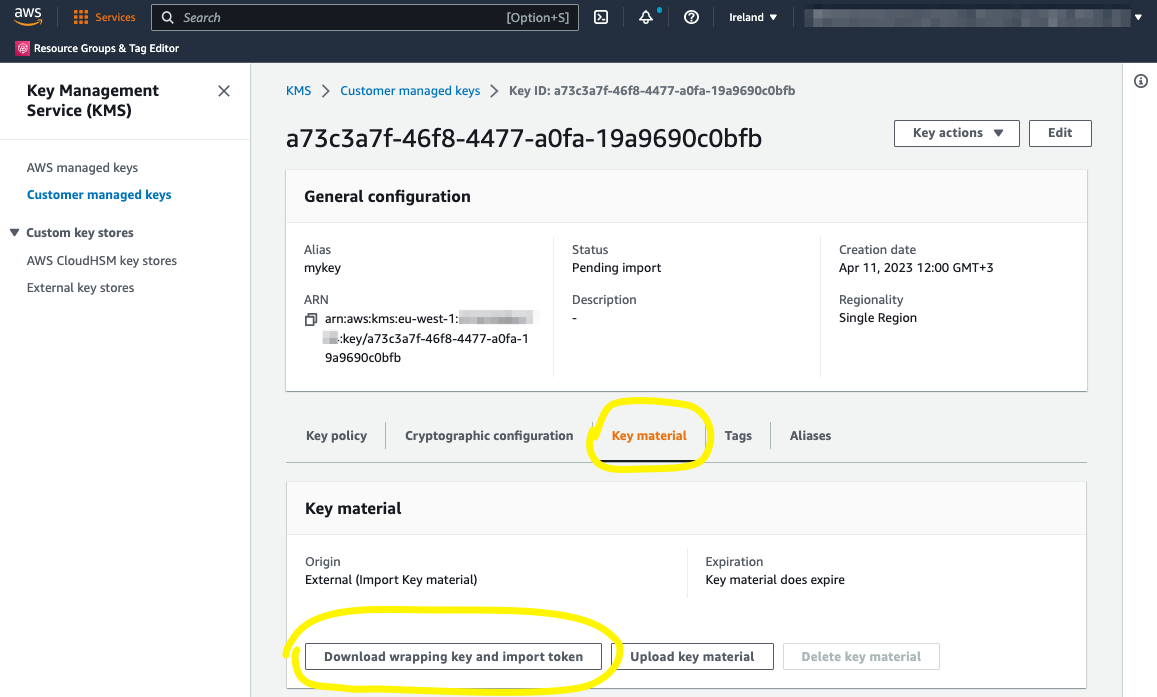
After creating the key, you are most likely forwarded to the import key material page. You can download the wrapping key there, but all this is also located under your key: KMS -> Customer managed keys -> mykey -> Key material.
Download wrapping key and import token
Select the “RSAES_OAEP_SHA_1” algorithm, default by the OpenSSL tool to encrypt the key in the next phase, and press the “Download wrapping key and import token” button.
Generate the encryption key material
This section will generate a plaintext random key and encrypt it with AWS wrapping key.
Step 1. Extract the wrapping key and import token
Extract the downloaded zip archive. At the time of writing, the file name was ImportParameters.zip.
Step 2. Generate the plaintext random key
You need the OpenSSL command line tool installed on your machine for this step. Generate 32 pseudo-random bytes with the rand command and output the result to the file named PlaintextKeyMaterial.bin with the following command:
openssl rand -out PlaintextKeyMaterial.bin 32
Step 3. Encrypt the plaintext key with AWS wrapping key
We are encrypting next your plaintext key with a wrapping key, a 2048-bit RSA public key, which is unique to your AWS account. When AWS KMS receives your encrypted key material, it uses the corresponding private key to decrypt it (asymmetric encryption). Command:
openssl rsautl -encrypt \
-in PlaintextKeyMaterial.bin \
-oaep \
-inkey wrappingKey_… \
-keyform DER \
-pubin \
-out EncryptedKeyMaterial.bin
Replace the “wrappingKey_…” with your correct file name from the extracted zip archive. The file name should start with “wrappingKey_”. It will create a new file named EncryptedKeyMaterial.bin.
Upload the encrypted key material back to AWS with the import token
Back to the AWS Console and your key’s “Key material” tab! This time choose the “Upload key material” button.
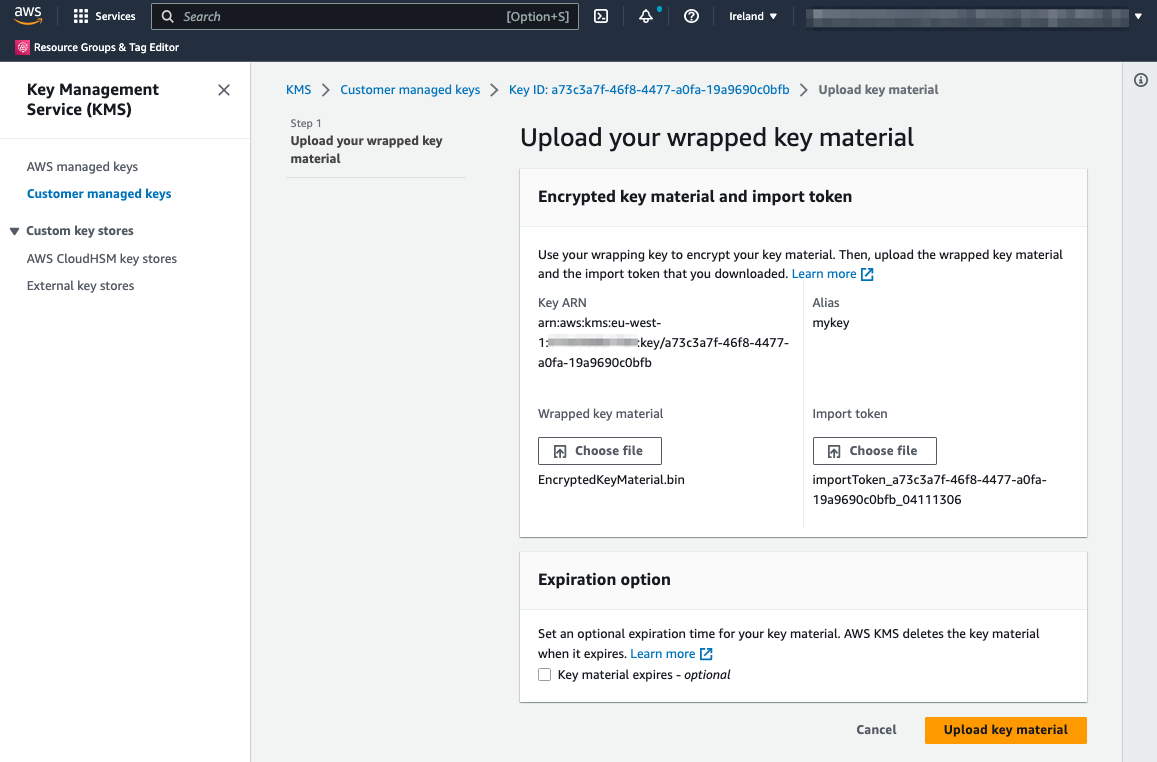
Step 1. Upload wrapped key material
First, press the “Choose file” button under the “Wrapped key material title” and select the EncryptedKeyMaterial.bin file.
Next, press the “Choose file” button under the “Import token” title and select the extracted file starting with “importToken_”.
Finally, press the “Upload key material” button in the lower right corner.
Upload key material
Now let’s encrypt some data!
Next, we will demonstrate the encryption and decryption features with AWS Command Line Interface.
Step 1. Create a text file to encrypt with your favorite editor
Name it my_secret_message.txt and add “This is my secret message” as content.
Step 2. Encrypt the contents of the file
Next, we encrypt the content and output the resulting ciphertext to a new file named my_encrypted_secret_message.enc. The result is on top of encryption base64 encoded, so we are also piping the result to the base64 command for decoding:
aws kms encrypt \
--key-id alias/mykey \
--plaintext fileb://my_secret_message.txt \
--query CiphertextBlob \
--output text \
| base64 -d > my_encrypted_secret_message.enc
To validate that the content is a ciphertext, so gibberish, you can check the file contents:
cat my_encrypted_secret_message.enc
Step 3. Decrypt the ciphertext
To decrypt, we are using the decrypt command. Again the result is base64 encoded, so piping is needed:
aws kms decrypt \
--ciphertext-blob fileb://my_encrypted_secret_message.enc \
--query Plaintext \
--output text \
| base64 -d > my_decrypted_secret_message.txt
To validate, check the file contents:
cat my_decrypted_secret_message.txt
Note that no key identifier or alias is specified this time! AWS KMS stores the key identifier in the ciphertext blob. If you delete the KMS key, this link is gone, and you can’t decrypt your data anymore. If you want to change the logical KMS key, or the imported key material, create a new KMS key and use the re-encrypt operation with a new KMS key to change the metadata - this is also known as manual key rotation. Imported key material is permanently associated with your KMS key. Because of this destructive and dangerous nature, KMS keys have a waiting period of 7-30 days, defaulting 30 days, before the deletion.
Caveats: You called an HTTPS endpoint of the KMS and requested encryption in the AWS multi-tenant cluster of hardware security modules. So we have a network latency factor to consider. Also, there is a limit of 4 KB to encrypt. For both limitations, the answer is a data key - so-called envelope encryption. But before that, let’s play a little with the key material, the actual encryption key.
Let’s delete the key material!
An exciting advantage or opportunity of using your own key material is the possibility to delete the actual encryption key from the logical KMS key container, instantly removing the ability to decrypt the data. You can then later on import back the original key material, it needs to be the original or the import fails, and gain back the ability to decrypt the data! Let’s demonstrate this part.
Step 1. Delete the key material
Go back to the AWS console and press the “Delete key material” button on the key material tab of the page.
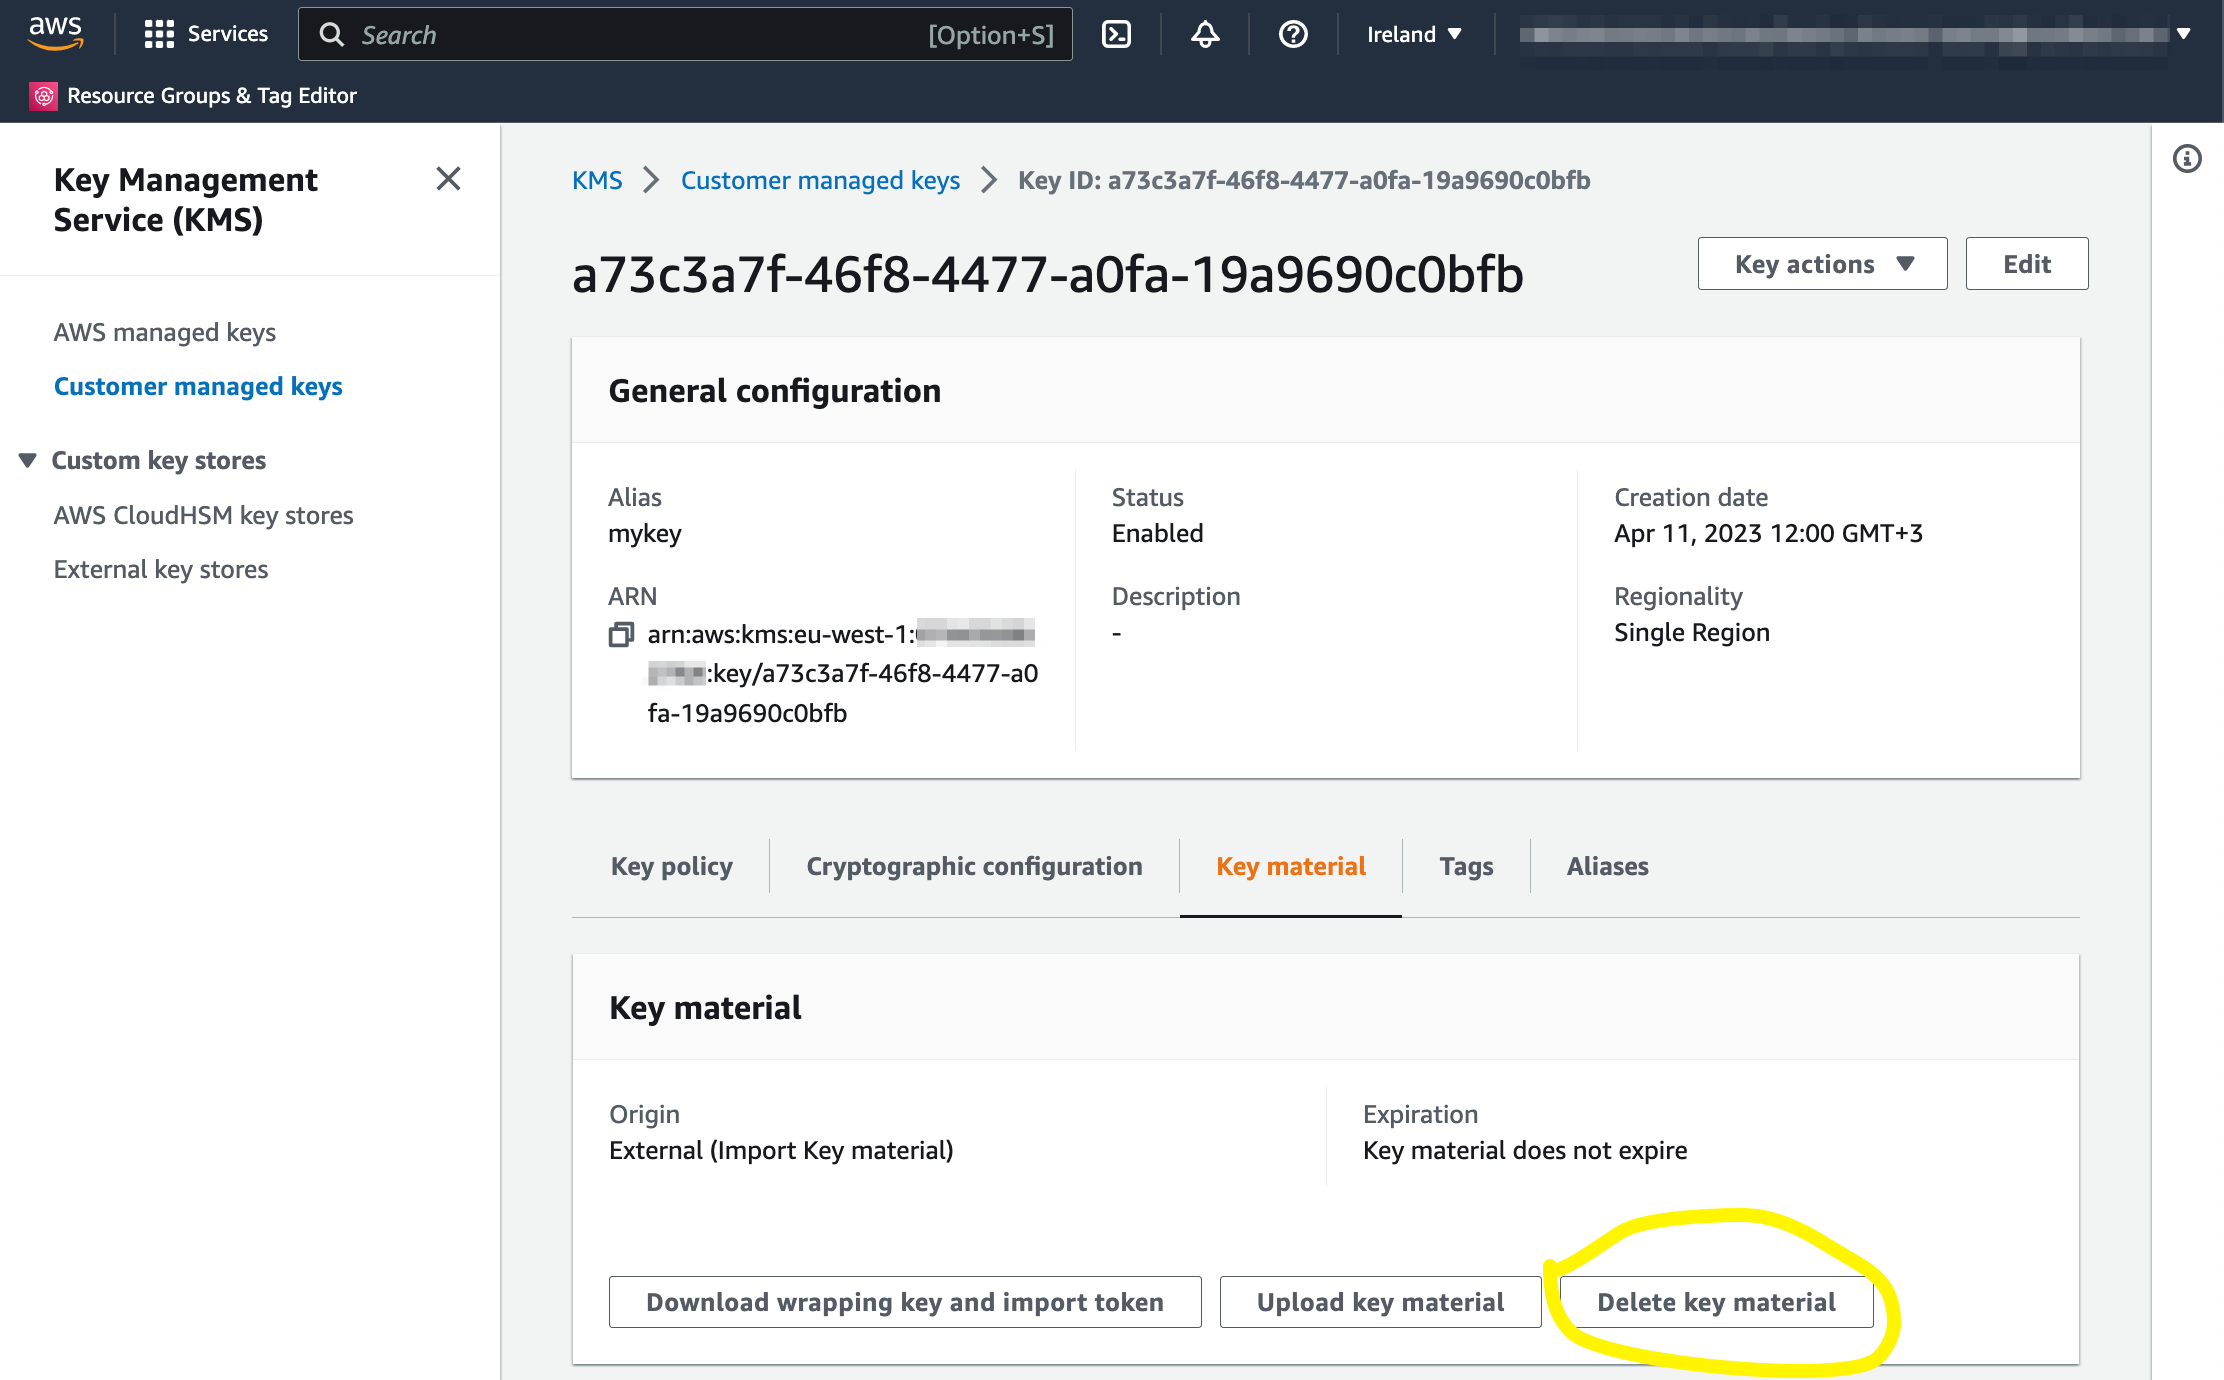
Delete key material
Note the warning: “Deleting key material makes all data encrypted under the AWS KMS key unrecoverable unless you re-import the same key material into the same KMS key. The KMS key is not affected by this operation.”
Confirm by checking the box next to the label “Confirm that you want to delete this key material.” Press the “Delete key material” button.
Step 2. Try to decrypt our secret message
Let’s copy-paste the same CLI decrypt command that we used before:
aws kms decrypt --ciphertext-blob fileb://my_encrypted_secret_message.enc --query Plaintext --output text | base64 -d > my_decrypted_secret_message.txt
You should now get an error message similar to this: “An error occurred (KMSInvalidStateException) when calling the Decrypt operation: arn:aws:kms:eu-west-1:xxxxxxxxxxxx:key/a73c3a7f-46f8-4477-a0fa-19a9690c0bfb is pending import.”
Step 3. Import the material back
Import the material back to your KMS key as described in the “Upload the encrypted key material back to AWS with the import token.” section.
Step 4. Try to decrypt it again
It takes a little moment for the status to change back to Enabled, but you should quickly be able to decrypt your data again.
Envelope Encryption
Envelope encryption is the practice of encrypting plaintext data with a data key and then encrypting the data key under another key. We can then store the encrypted data key together with the actual data. That’s why it’s called envelope encryption - both are held in the same physical place! You can use AWS KMS to generate, encrypt, and decrypt the data keys that you use outside of AWS KMS to encrypt your data. Remember that KMS keys are created in AWS KMS and never leave AWS KMS unencrypted!
Step 1. Generate the data key
aws kms generate-data-key --key-id alias/mykey --key-spec AES_256
Supported algorithms (key-spec parameter) are AES_128 and AES_256, 128-bit, and 256-bit length AES keys. The response contains both plaintext and ciphertext versions of the key, but again both are base64 encoded. The response is a JSON document that has a similar structure to this:
{
     "CiphertextBlob": "AQIDAHhg...==",
     "Plaintext": "cRN7COdX...=",
     "KeyId": "arn:aws:kms:eu-west-1:xxxxxxxxxxxx:key/a73c3a7f-46f8-4477-a0fa-19a9690c0bfb"
 }
Remember that the plaintext version should never be stored; it’s there, so you can straight encrypt the data without calling the KMS service for data key decryption. The plaintext version should be discarded after use. I will do a quick demonstration by storing both in to own files, but this is not the best practice. At least delete the plaintext files after use!
Step 2. Store keys as files
Copy the value of the CiphertextBlob property to a file named ciphertext_datakey.base64 and the value of the Plaintext property to plaintext_datakey.base64.
Step 3. Decode the keys
Decode the keys with base64 and store them to new files:
base64 -d -i plaintext_datakey.base64 > plaintext_datakey
base64 -d -i ciphertext_datakey.base64 > ciphertext_datakey
Step 4. Encrypt the data outside AWS using OpenSSL
openssl enc -e -aes256 -kfile plaintext_datakey \
-in my_secret_message.txt \
-out my_secret_message.enc
Step 5. Decrypt the data using OpenSSL
openssl enc -d -aes256 -kfile plaintext_datakey \
-in my_secret_message.enc \
-out new_plaintext_message.txt
Validate the content of new_plaintext_message.txt
Step 6. Later on, decrypt the data key
We can decrypt the data key stored with our encrypted data with the KMS decrypt command. Again the result is base 64 encoded, so we are piping it for decoding:
aws kms decrypt \
--ciphertext-blob fileb://ciphertext_datakey \
--query Plaintext \
--output text | base64 -d > plaintext_datakey_2
And you are ready to decrypt the data like in step 5 with your new plaintext_datakey_2 file!
Summary
We covered the AWS KMS service’s basic building blocks of the core functionality - encryption and decryption using the encryption key. We didn’t cover how other AWS services use the KMS when you select it as an encryption option; there’s some variety. We didn’t discuss the various other key material options or key management. We didn’t discuss the auditability of the key usage, which is the key feature in a compliance sense. Hopefully, this still helps to clarify the core of the KMS and helps diving into these other topics.
Encryption using your key material brings you a lot of new challenges because you are responsible for keeping the material safe and backed up. Also, the randomness of the material is not trivial, and dedicated hardware has been developed to calculate these cryptographic operations, usually called Hardware Security Modules (HSM). The external key store is the latest addition to key material options, and I think it’s the preferred choice if you need to have your key material generated outside AWS. If you don’t have such compliance requirements, consider the AWS-managed options.
References AWS KMS Developer Guide