


This article is part of a series about Amazon Verified Permissions:
- Part 1 — Essentials
- Part 2 — Integration with your app
- Part 3 — Integration with Amazon Cognito
- Part 4 — Complete Example
- Part 5 — Integration with AWS CloudTrail
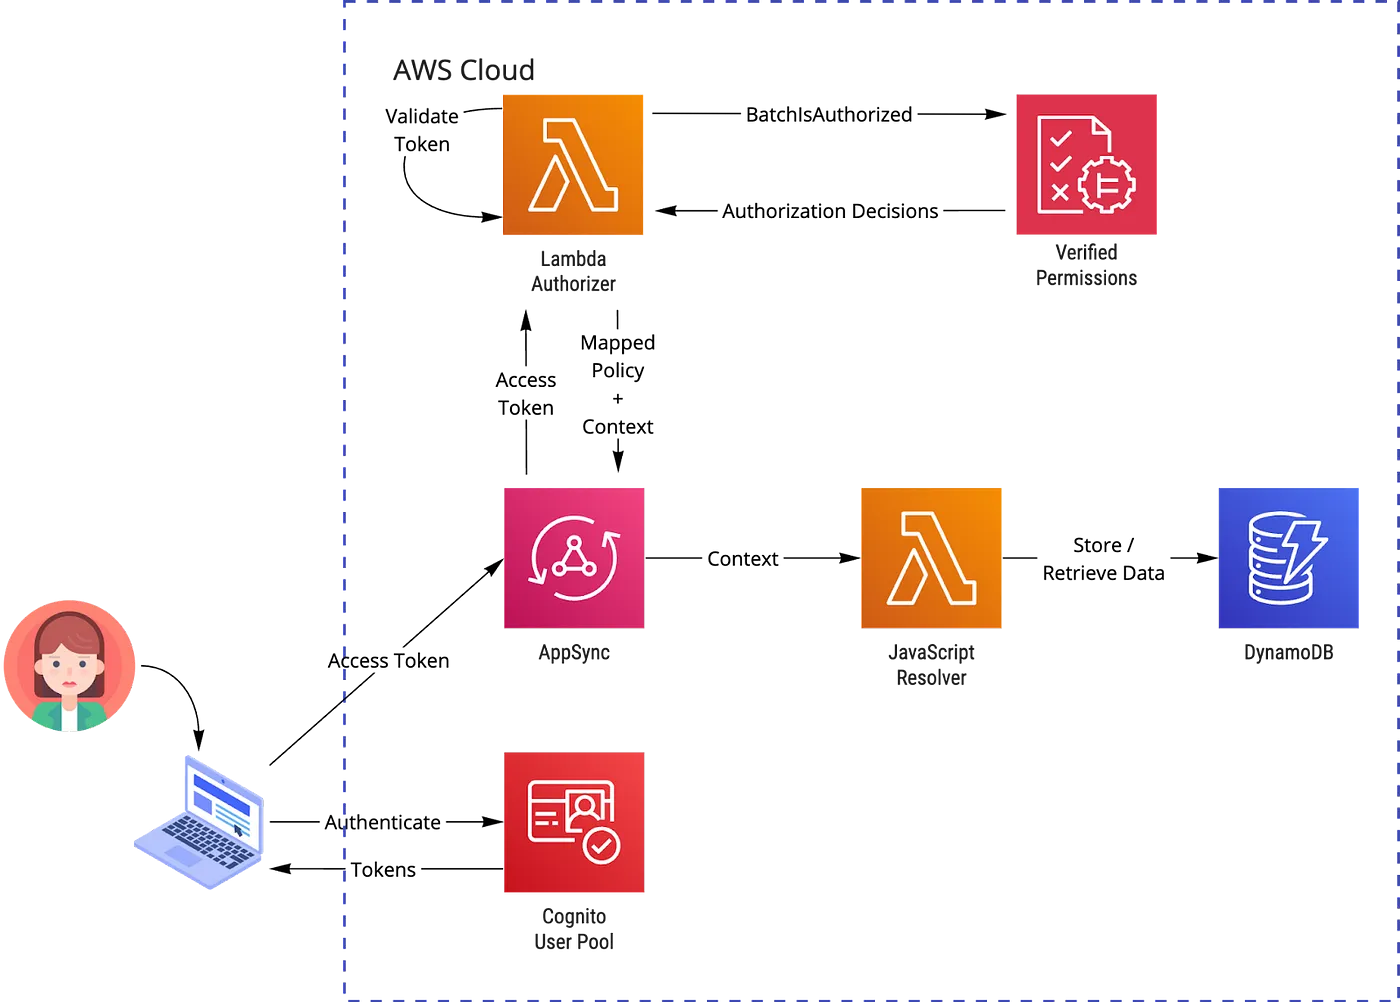
Hello, and welcome aboard again! This article will dive into a complete working architecture utilizing multiple AWS services: Amazon Verified Permissions, Amazon Cognito, Amazon AppSync (with JavaScript resolvers), and Amazon DynamoDB — a complete example of a GraphQL API that uses Amazon Verified Permissions for authorization requests.
We are utilizing the BatchIsAuthorized API to simultaneously get authorization decisions for all supported API queries and mutations, including the denied fields. We are doing some mapping and the token signature validation because of the lack of support for batch authorization and Cognito groups with ready IsAuthorizedWithToken API. We use OpenTofu/Terraform for the infrastructure, TypeScript for JavaScript resolvers, and the Lambda Authorizer.
The idea is to implement all our learned tricks and build an API for the hero management system. The architecture:
The solution is written with an infrastructure-as-code approach, but we are going through the necessary parts and manual steps. Pre-requisites
You need to have AWS CLI, OpenTofu (or Terraform), and Node installed on your machine, as well as Git, to clone the repository from GitHub.
I have used the following:
- AWS CLI v2.15.30
- OpenTofu v1.6.2
- Node v21.6.0
- Terragrunt v0.55.3 (Optional, supports OpenTofu from v0.52.0)
Terraform Providers and Modules Used
The solutions use the following Terraform dependencies.
Terraform providers:
- hashicorp/aws
- hashicorp/awscc
Some modules from the excellent terraform-aws-modules repository:
- terraform-aws-modules/appsync/aws
- terraform-aws-modules/dynamodb-table/aws
- terraform-aws-modules/lambda/aws
Cognito
We must prepare a Cognito User Pool and create User and Admin groups and a User Pool Client. All these steps are outlined in the infra/cognito.tf file. We have encountered this in the previous articles, but now we are also creating the groups with aws_cognito_user_group resource from the hashicorp/aws provider:
resource "aws_cognito_user_group" "user" {
  name         = "User"
  user_pool_id = aws_cognito_user_pool.this.id
}
Database
The solution uses a DynamoDB table as a database, and we are using a single table design defined in the infra/dynamodb.tf file. That’s why our schema is generic; the partition key is named PK, and the sort key SK. There is also a global secondary index named GSI1 with a similar generic approach, GSI1PK as the primary key, and the GSI1SK as the sort key. I recommend Alex DeBries’s great articles and re:Invent sessions to get familiar with the ideology. Start here. Also, Rick Houlihan’s re:Invent sessions, like DynamoDB Deep Dive: Advanced Design Patterns (DAT403).
We could have used any other approach as well. Our example is simple, but it also acts as a playground if you want to develop your DynamoDB skills further. The most important attributes in our table for our hero profiles:

In the global secondary index, we use the table sort key as the primary key and the region attribute as the sort key for our hero profile data. Now we can query the profiles from the specific region:

PS. I generated superhero names and their true identities with Amazon Bedrock and the Anthropic Claude v2.1 model.
AppSync GraphQL Schema
GraphQL schema defines what data can be queried or mutated. To support the database schema above, we can use the following (located in schema.graphql):
enum REGION {
  EMEA
  NA
  LATAM
  APAC
}

type Hero {
  heroId: ID
  region: REGION
  name: String
  alias: String
}

type HeroIterator {
  heroes: [Hero]
  nextToken: String
}

input HeroInput {
  name: String!
  region: REGION!
  alias: String!
}

type Mutation {
  addHero(name: String!, region: REGION!, alias: String!): Hero!
}

type Query {
  getHero(heroId: ID!): Hero
  listHeroes(region: REGION, limit: Int, nextToken: String): HeroIterator!
}

schema {
  query: Query
  mutation: Mutation
}
List heroes query also has pagination available, controlled by the limit and nextToken attributes. You can control the page size with the limit attribute, but the response is also automatically paginated if the DynamoDB response is larger than 1 MB. I have used the CLI tool codegen from AWS Amplify to generate the TypeScript types based on the schema file (API.ts, mutations.ts, and queries.ts files).
Verified Permissions
The infrastructure code is located in the infra/verified-permissions.tf file and the schema can be found in the policies/schema.json.
Policies:
- For the admin persona: policies/admin_policy.cedar.
- For the user persona: policies/user_policy.cedar.
The difference is that the admin can do all actions: AddHero, ListHeros, GetHero, and GetHeroName. Our user persona is permitted only to query GetHero and ListHeroes. So, there is no access to add a hero or reveal the real identity of the hero with the GetHeroName action.
AppSync Infrastructure as Code
AppSync is the service that glues our architecture together. File appsync.tf contains all the necessary infrastructure definitions to create an AppSync API with Lambda Authorizer. It also defines our DynamoDB data source:
datasources = {
    dynamodb_table = {
      type       = "AMAZON_DYNAMODB"
      table_name = join("-", [var.nameprefix, "table", var.env])
      region     = var.aws_region
    }
}
The resolvers: queries to get an individual hero profile and list of heroes, and the mutation to add a hero:
resolvers = {
  "Query.getHero" = {
    kind  = "UNIT"
    type  = "Query"
    field = "getHero"
    code  = file("../out/appsync/getHero.js")
    runtime = {
      name            = "APPSYNC_JS"
      runtime_version = "1.0.0"
    }
    data_source = "dynamodb_table"
  }

  "Query.listHeroes" = {
    kind  = "UNIT"
    type  = "Query"
    field = "listHeroes"
    code  = file("../out/appsync/listHeroes.js")
    runtime = {
      name            = "APPSYNC_JS"
      runtime_version = "1.0.0"
    }
    data_source = "dynamodb_table"
  }

  "Mutation.addHero" = {
    kind  = "UNIT"
    type  = "Mutation"
    field = "addHero"
    code  = file("../out/appsync/addHero.js")
    runtime = {
      name            = "APPSYNC_JS"
      runtime_version = "1.0.0"
    }
    data_source = "dynamodb_table"
  }
}
We are using the APPSYNC_JS runtime, which is equal to JavasScript Resolver, announced in November 2022. The old-school option would be to use Apache Velocity Templates (VTL), but with JavaScript, we can write unit tests more easily and possibly reuse the code. I have provided an example of the unit test in the addHero.test.ts file. Don’t get confused, so mix JS resolvers with Lambda resolvers! JS resolvers don’t have lambda cold start and come with no extra cost, but they have many limitations, like no network or file system access. You can also use many other programming languages with Lambda functions. Check the AWS documentation for more information about the APPSYNC_JS runtime.
Only pipeline resolvers were supported at the announcement, but on August 16th, 2023, AWS extended the support to unit resolvers. This is an excellent place to test those out, and the kind = “UNIT” attribute controls that part. JS resolver implementations are located under the src/appsync/resolvers directory.
AppSync Lambda Authorizer
Lambda Authorizer is the core of this article, and the implementation can be found in the src/appsync/authorizer/authorizer.ts file. The first step is to verify that the access token has not expired and that it has a valid signature signed by the Cognito User Pool. I’m using the aws-jwt-verify library for this, which makes it a straightforward operation:
import { CognitoJwtVerifier } from "aws-jwt-verify";

const verifier = CognitoJwtVerifier.create({
  userPoolId: "<cognito user pool identifier>",
  tokenUse: "access",
  clientId: "<cognito client identifier>",
});

const token = await verifier.verify(authorizationToken);
The verify function returns the decoded token payload, which we can use to check the user identifier (sub) and the Cognito groups (cognito:groups):
{
  "sub": "b89463bf-c061-4945-a17b-4a3d9bea33fa",
  "cognito:groups": [
    "User"
  ],
  "iss": "https://cognito-idp.eu-north-1.amazonaws.com/eu-north-1_5hlzvmgIe",
  ...
}
We are mapping the combination of the user pool ID and the sub claim to the user entity identifier. Cognito groups claim, which consists of group names, we need to map to Verified Permissions entity item parents in the BatchIsAuthorized requests:
{
  identifier: {
    entityType: "HeroApp::User",
    entityId: "eu-north-1_5hlzvmgIe|b89463bf-c061-4945-a17b-4a3d9bea33fa",
  },
  parents: [
    {
      entityType: "HeroApp::Group",
      entityId: "User",
    }
  ],
}
We also have a JavaScript map, which is used to construct the BatchIsAuthorized requests using the keys and for mapping the actions back to GraphQL fields for AppSync Lambda Authorizer output:
[
    ["AddHero", "Mutation.addHero"],
    ["GetHero", "Query.getTask"],
    ["ListHeroes", "Query.listHeroes"],
    [
      "GetHeroName",
      `arn:aws:appsync:${region}:${accountId}:apis/${apiId}/types/Hero/fields/name`,
    ],
]
All the mapping functions can be found in the src/appsync/authorizer/permissions.ts files.
Deployment
There are local Terragrunt configurations you can use to deploy the solution. The default uses AWS Stockholm region (eu-north-1), but you can change that from the deployment/dev/env.hcl file. Requires active AWS CLI session or access keys profile:
$ git clone https://github.com/teemuniiranen/hero-api
$ cd hero-api/deployment/dev/hero-api
$ terragrunt init
$ terragrunt apply
npm install
Bundle the TypeScript code into JavaScript:
npm run bundle
Run the tests:
npm run test
The Terraform code is located under the infra directory. Check the variables.tf; aws_region controls the region.
From the output, note down the user identifier (cognito_user_pool_id) and the Cognito client identifier (cognito_client_id).
Testing
Next, we create some test users for Cognito and assign them to groups. Finally, we use the access tokens to call the AppSync API in the AWS Console.
Create a Cognito user
You can create new users via AWS Console, but the user is required to change the temporary password after creation. Also, we need to authenticate the user to get the tokens. It’s easy with an AWS CLI command:
aws cognito-idp admin-create-user \
  --user-pool-id <your cognito user pool id> \
  --username test-user
Change the generated password and make it permanent:
aws cognito-idp admin-set-user-password \
  --user-pool-id <your cognito user pool id> \
  --username test-user \
  --password <your password> \
  --permanent
And assign the user to the User group:
aws cognito-idp admin-add-user-to-group \
  --user-pool-id  <your cognito user pool id> \
  --username test-user \
  --group-name User
Finally, sign in to get the tokens for the API:
aws cognito-idp admin-initiate-auth \
  --auth-flow ADMIN_NO_SRP_AUTH \
  --user-pool-id  <your cognito user pool id> \
  --client-id  <your cognito client id> \
  --auth-parameters USERNAME=test-user,PASSWORD=<your password>
Copy the value of the AccessToken property in the response:
{
    "ChallengeParameters": {},
    "AuthenticationResult": {
        "AccessToken": "eyJra...
Repeat the process to create an admin user by changing at least the username and the group name to Admin.
Test with AppSync Queries Tool
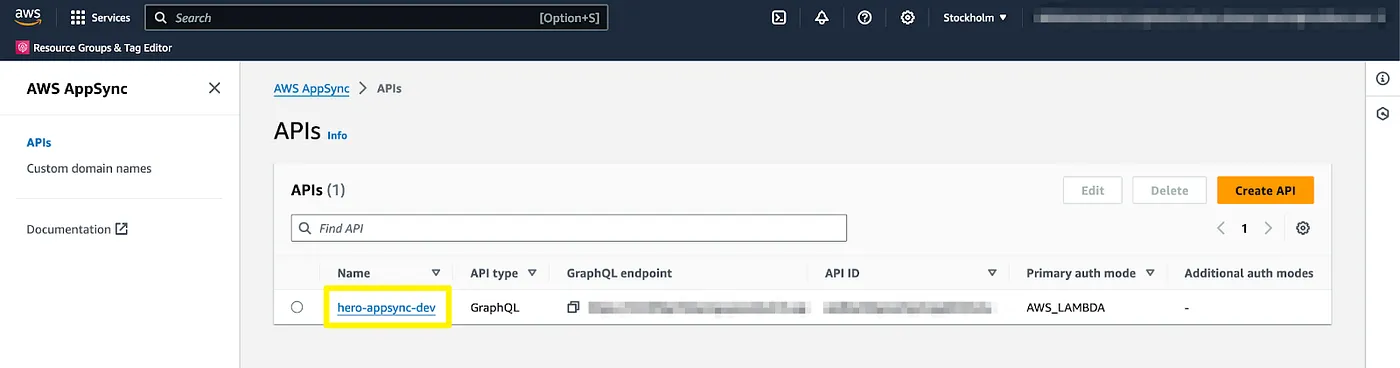
AppSync has a built-in test tool for queries. Open the AWS Console, go to AppSync service, and select the hero API:
From the left-hand side menu, select the Queries. AWS Lambda has been pre-selected for the authorization provider. Now input our admin user’s access token into the “Authorization Token” field. From the Explorer window, select Mutation and press the “+” button to generate a template. Fill in the template and run the mutation from the Run button:
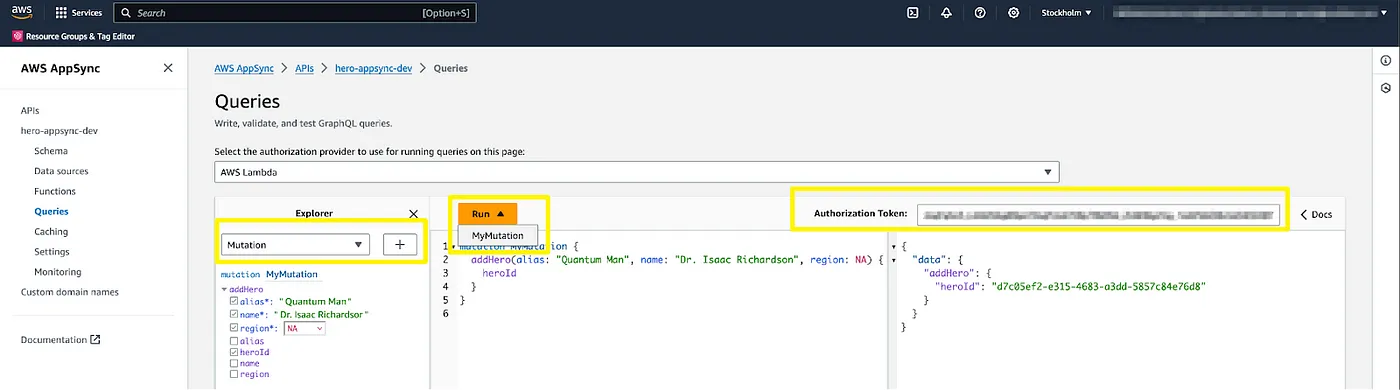
The result window on the right-hand side should now show some data related to the newly added hero. The great thing about GraphQL is that you can control what data should be returned. In the example above, only heroId is selected, but you can also add other hero entity fields. Add a couple of heroes more. If you change the token to the test user’s access token, you get a not authorized response:
{
  "data": null,
  "errors": [
    {
      "path": [
        "addHero"
      ],
      "data": null,
      "errorType": "Unauthorized",
      "errorInfo": null,
      "locations": [
        {
          "line": 2,
          "column": 3,
          "sourceName": null
        }
      ],
      "message": "Not Authorized to access addHero on type Mutation"
    }
  ]
}
Now change to list heroes query and try to list all fields:
query MyQuery {
  listHeroes {
    heroes {
      alias
      heroId
      name
      region
    }
  }
}
You should get the list of heroes but with null name fields and errors stating that you are not authorized to access the name on type Hero:
...
"errors": [
    {
      "path": [
        "listHeroes",
        "heroes",
        0,
        "name"
      ],
      "data": null,
      "errorType": "Unauthorized",
      "errorInfo": null,
      "locations": [
        {
          "line": 6,
          "column": 7,
          "sourceName": null
        }
      ],
      "message": "Not Authorized to access name on type Hero"
    },
 ...
You can continue experimenting with AppSync by changing the Verified Permissions policies. The caching is turned off for the authorizer response, so you can experiment with the policy changes without delay. You can turn the caching on by changing the authorizer_result_ttl_in_seconds value to higher than zero seconds in infra/appsync.tf file.
Conclusion
This architecture provides a robust foundation for implementing role-based access control for the GrapghQL API. The caching can be turned on to offer faster authorization decisions and reduce Verified Permissions costs. The trade-off is that you must be careful when extending the API because this method allows access by default if the new action is not mapped to the static configuration array! Another option is not to use the batch authorization method and always map the query or mutation and the requested fields to the authorization call. You could use a naming convention to make it more generic. I hope you found this example helpful in applying Verified Permissions in your applications.
Continue reading: Part 5 — Integration with AWS CloudTrail
–