


This article is part of a series about Amazon Verified Permissions:
- Part 1 — Essentials
- Part 2 — Integration with your app
- Part 3 — Integration with Amazon Cognito
- Part 4 — Complete Example
- Part 5 — Integration with AWS CloudTrail
The previous article covered essential topics such as schema design and policies. This article will delve into various strategies for integrating Amazon Verified Permissions into your application, focusing on serverless building blocks like applications behind Amazon API Gateway or Amazon AppSync.
Lambda Authorizers
Lambda Authorizers enables you to implement custom authorization logic by running your code. Amazon API Gateway and Amazon AppSync support Lambda Authorizers, albeit with functional differences.
Lambda Authorizer with Amazon API Gateway
AWS has a great blog post about implementing custom authorization logic with API Gateway. I recommend checking it out before going any further. DynamoDB is a policy store in that solution, but you can also apply the approach with Amazon Verified Permissions. The architecture could be similar to this:

The policy format used by API Gateway is similar to Amazon IAM policies. For our hero application and admin role, we could return a policy similar to this:
{
  "Version": "2012-10-17",
  "Statement": [
    {
      "Sid": "Hero-API",
      "Effect": "Allow",
      "Action": "execute-api:Invoke",
      "Resource": [
        "arn:aws:execute-api:eu-north-1:123456789012:her0dhp7b5/v1/GET/heroes",
        "arn:aws:execute-api:eu-north-1:123456789012:her0dhp7b5/v1/POST/heroes",
        "arn:aws:execute-api:eu-north-1:123456789012:her0dhp7b5/v1/GET/heroes/*"
      ]
    }
  ]
}
One of the advantages of this approach is that it can cache the response for a maximum of 3600 seconds or 1 hour. This caching helps to reduce the number of function executions and latency. The HTTP header containing the authentication token serves as a cache key, and you can perform initial validation with regex to prevent calls with incorrect token headers.
A good option for integration! To integrate with the Amazon Verified Permissions, we would need to verify the token and map the token content and the request data to the Amazon Verified Permissions authorization requests, but more on that later. Remember to return a constant response for a token when using caching because API Gateway will also use the same response for other API endpoints.
Lambda Authorizer with Amazon AppSync
The architecture with Lambda Authorizer is similar; just change the API Gateway icon to the AppSync icon:
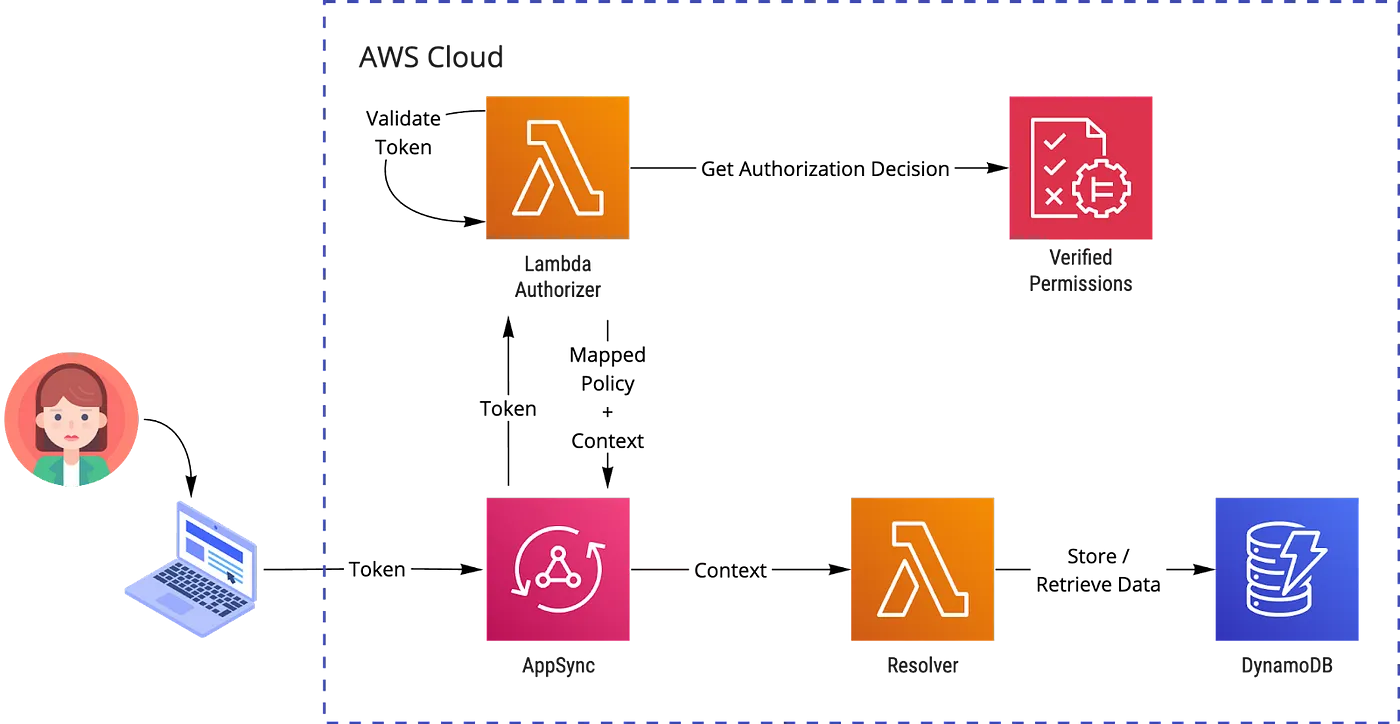
AppSync takes a different approach with the Lambda Authorizer output. It allows or denies access based on the isAuthorized field value together with the fine-grained information in the deniedFields attribute. You can also pass context data to resolvers in the resolverContext field and override the default caching time-to-live with the ttlOverride field. A JavaScript example for our user without adding permissions (as a little bonus, also a feature that denies access to the name field to reveal the true identity of our hero):
{
  "isAuthorized": true,
  "resolverContext": {
    "userId": "a2701ad0-5ed1-468d-b779-6eb8e594b6fd"
  },
  "deniedFields": [
    "Mutation.addHero",
    "arn:aws:appsync:eu-north-1:123456789012:apis/her0d5cbi5gsbhsm2hpnskwpim/types/Hero/fields/name"
  ]
}
Note isAuthorized: true here! Because our deniedFields lists Mutation.addHero as denied, the result is still denied if the current request was actually for the addHero mutation. So, the isAuthorized field is not acting as a master switch, which helps us build constant, cached responses and prevents us from accidentally allowing all further requests if we want to use the deny strategy.
The same maximum time-to-live value, 3600 seconds, also applies to AppSync, and you can do the initial token validation with regex. You can then do further logic in the resolver and return an unauthorized response. In practice, you must move some of the authorization logic to the resolver by returning true in the isAuthorized field and passing the context data in the resolverContext field if you consider caching and the authorizing data resides outside the token, in the request context (query string, variables, etc.).
Other Integration Points
Another option is the AVP authorization request in our application code, which could be a Lambda function behind the API Gateway or a Lambda resolver or resolver pipeline in the case of AppSync. For example, your microservice may run inside the Docker container. The downside is that we are adding some authorization logic together near the business logic. On the other hand, we can implement finer-grained caching, for example, not just token-based caching.
Pricing Considerations
Without caching, the authorizer Lambda runs for every API Gateway or AppSync request that hits the API and generates many Lambda invocations and Amazon Verified Permissions calls. Amazon Verified Permission uses a tiered pricing model. The first 40 million requests per month cost $150/million authorization requests, but there is no minimum number of requests.
Example: If your application makes 10,000 authorization requests, then you are charged for 10,000 requests ($150 / 1,000,000 * 10,000 = $1.50). To compare it with the Lambda pricing, and if you could utilize ARM architecture, the price would be $0.20 / million requests in the Stockholm region. For the exact 10,000 requests and if the average execution time would be 100 ms with 512 MB of memory — this makes $0.20 / 1,000.000 * 10,000 + 100ms * $0.0000000083/ms * 10,000 = $0.002 + $0.0083 = $0.01. So, compared to Lambda pricing, it’s high, but with a smart caching strategy, you can save money and keep your applications fast.
The trade-off with caching is that changes to your policies won’t take place immediately.
Authorization Requests
At the time of writing, you can use three different authorization APIs: IsAuthorized, IsAuthorizedWithToken, and BatchIsAuthorized. We will handle the IsAuthorizedWithToken API in the following article because it relates to Amazon Cognito Integration. Amazon also recently increased the default quota for authorization APIs from 30 to 200 transactions per second (TPS), and customers requiring more than 200 TPS can request a quota increase, so this is a so-called soft limit.
IsAuthorized
IsAuthorized is for making a single authorization decision described in the request parameters. Here is an example request from the previous article but now just executed with AWS SDK for JavaScript/TypeScript:
import {
  VerifiedPermissionsClient,
  IsAuthorizedCommand,
  IsAuthorizedCommandInput,
} from "@aws-sdk/client-verifiedpermissions";

const client = new VerifiedPermissionsClient();

const input: IsAuthorizedCommandInput = {
  policyStoreId: "my-policy-store-id",
  principal: {
    entityType: "HeroApp::User",
    entityId: "b89463bf-c061-4945-a17b-4a3d9bea33fa",
  },
  action: {
    actionType: "HeroApp::Action",
    actionId: "GetHero",
  },
  resource: {
    entityType: "HeroApp::Hero",
    entityId: "825837ac-2023-4aff-afc8-a39787b70e5c",
  },
  entities: {
    entityList: [
      {
        identifier: {
          entityType: "HeroApp::User",
          entityId: "b89463bf-c061-4945-a17b-4a3d9bea33fa",
        },
        parents: [
          {
            entityType: "HeroApp::Group",
            entityId: "User",
          },
        ],
      },
    ],
  },
};

const command = new IsAuthorizedCommand(input);
const isAuthorizedResponse = await client.send(command);
// {
//   "decision": "ALLOW", // or "DENY"
//   "determiningPolicies": [
//       {
//           "policyId": "Gnv793ZtShkv2j7wxvqBai" // User Policy
//       }
//   ],
//   "errors": [], // possible list of object with errorDescription field
// }
BatchIsAuthorized
With BatchIsAuthorized, you can make a series of decisions about multiple authorization requests for one principal or resource. The principal or the resource parameter must be identical across all requests, or you will get an error response. The BatchIsAuthrorized method is relatively new, and it was announced just before the last re:Invent on November 20th, 2023. With BatchIsAuthorized, you can process up to 30 authorization decisions, simplifying building applications where a single user action requires multiple actions to be authorized. I like this addition! With authorizing in batches, you can significantly reduce costs by paying just for one request. The batching also affects the solution’s performance because you do not suffer from the networking latency between the individual IsAuthorized calls.
What I like even more is that this also simplifies user interface usage. We can batch call authorization from a user experience perspective to show or hide the UI section based on the same permissions! So we can keep the UI in sync with our API permissions and dynamically change the experience by changing the policies with no code changes needed if you have mapped all the necessary data. More about the mapping will be in the next section.
Note that the Test Bench feature in the AWS Console doesn’t currently support BatchIsAuthorized, but you can use AWS CLI for these calls.
Let’s also have an AWS SDK example for the BatchIsAuthorized, but let’s apply it to our hero scenario and the AppSync Lambda authorizer above. Let’s request the authorization decision for our non-admin user and get all our supported actions: GetHero, AddHero, ListHeroes, plus the new GetHeroName that controls the access to the name attribute, the real identity of the hero. GetHeroName should be automatically denied because we haven’t introduced a policy allowing that action.
import {
  VerifiedPermissionsClient,
  BatchIsAuthorizedCommand,
  BatchIsAuthorizedCommandInput,
} from "@aws-sdk/client-verifiedpermissions";

const client = new VerifiedPermissionsClient();

const input: BatchIsAuthorizedCommandInput = {
  policyStoreId: "my-policy-store-id",
  requests: [
    {
      principal: {
        entityType: "HeroApp::User",
        entityId: "b89463bf-c061-4945-a17b-4a3d9bea33fa",
      },
      action: {
        actionType: "HeroApp::Action",
        actionId: "GetHero",
      },
    },
    {
      principal: {
        entityType: "HeroApp::User",
        entityId: "b89463bf-c061-4945-a17b-4a3d9bea33fa",
      },
      action: {
        actionType: "HeroApp::Action",
        actionId: "AddHero",
      },
    },
    {
      principal: {
        entityType: "HeroApp::User",
        entityId: "b89463bf-c061-4945-a17b-4a3d9bea33fa",
      },
      action: {
        actionType: "HeroApp::Action",
        actionId: "ListHeroes",
      },
    },
    {
      principal: {
        entityType: "HeroApp::User",
        entityId: "b89463bf-c061-4945-a17b-4a3d9bea33fa",
      },
      action: {
        actionType: "HeroApp::Action",
        actionId: "GetHeroName",
      },
    },
  ],
  entities: {
    entityList: [
      {
        identifier: {
          entityType: "HeroApp::User",
          entityId: "b89463bf-c061-4945-a17b-4a3d9bea33fa",
        },
        parents: [
          {
            entityType: "HeroApp::Group",
            entityId: "User",
          },
        ],
      },
    ],
  },
};

const command = new BatchIsAuthorizedCommand(input);
const isAuthorizedResponse = await client.send(command);
So, in total, 4 out of a maximum 30 requests. Note that we are not interested in a detailed level of the Hero resource, so we have left it out. The response would include a results array that we then would need to map to AppSync response format:
{
  "results": [
    {
      "decision": "ALLOW",
      "determiningPolicies": [
        {
          "policyId": "Gnv793ZtShkv2j7wxvqBai"
        }
      ],
      "errors": [],
      "request": {
        "action": {
          "actionType": "HeroApp::Action",
          "actionId": "GetHero"
        },
        "principal": {
          "entityType": "HeroApp::User",
          "entityId": "eu-north-1_5hlzvmgIe|b89463bf-c061-4945-a17b-4a3d9bea33fa"
        }
      }
    },
    {
      "decision": "DENY",
      "determiningPolicies": [],
      "errors": [],
      "request": {
        "action": {
          "actionType": "HeroApp::Action",
          "actionId": "AddHero"
        },
        "principal": {
          "entityType": "HeroApp::User",
          "entityId": "eu-north-1_5hlzvmgIe|b89463bf-c061-4945-a17b-4a3d9bea33fa"
        }
      }
    },
    {
      "decision": "ALLOW",
      "determiningPolicies": [
        {
          "policyId": "Gnv793ZtShkv2j7wxvqBai"
        }
      ],
      "errors": [],
      "request": {
        "action": {
          "actionType": "HeroApp::Action",
          "actionId": "ListHeroes"
        },
        "principal": {
          "entityType": "HeroApp::User",
          "entityId": "eu-north-1_5hlzvmgIe|b89463bf-c061-4945-a17b-4a3d9bea33fa"
        }
      }
    },
    {
      "decision": "DENY",
      "determiningPolicies": [],
      "errors": [],
      "request": {
        "action": {
          "actionType": "HeroApp::Action",
          "actionId": "GetHeroName"
        },
        "principal": {
          "entityType": "HeroApp::User",
          "entityId": "eu-north-1_5hlzvmgIe|b89463bf-c061-4945-a17b-4a3d9bea33fa"
        }
      }
    }
  ]
}
Mapping
No matter the integration point, some mapping is needed to pass the data required to authorization requests. Mapping is the key to success, and with more comprehensive mapping, you most likely don’t need the code change, only the change to the policy. In practice, the balance naturally depends on how fine-grained needs you have for authorization. With Lambda Authorizers introduced above, mapping to the supported output format is also needed, such as mapping the Amazon Verified Permissions response to the Lambda function output.
As you can see from these static API call examples above, all data related to the authorization rule must be present. You need to include the possible hierarchies, like a user belonging to a group (principal), which could be available in the request encoded to a JWT token. Or provide the attribute data to make attribute-based access control (attributes of the target resource). Conversely, this might force you to fetch that data from the database before the authorization call if it is not included in the request. Also, resources could be hierarchical. You might easily map the action part based on the request, but an excellent example of an exception is our GetHeroName action, which is not an AppSync query but a single GrapghQL field.
Conclusion
We covered quite a lot, which also took more time and thought than I had initially planned. Mapping the Amazon Verified Permissions request for role-based access control could be straightforward based on the original query. Still, attribute-based access control might require more data fetching before authorization. All this depends on the schema and how fine-grained the access control needs to be. In the following article, we continue in the world of mapping permissions and cover the Amazon Cognito integration and what Amazon has done to help you on that journey.
In the last re:invent 23, Amazon demonstrated Amazon Verified Permissions with a sample toy store application built with AWS Amplify. It uses the API Gateway Lambda Authorizer approach for the backend, and both IsAuthorized and BatchIsAuthroized were used in the demo. The session recording can be found on YouTube titled “AWS re:Invent 2023 — How to use Amazon Verified Permissions for authorization inside apps (SEC241)”. If you are eager to check the mapping implementation immediately, check the Java implementation for the Lambda Authorizer. I recommend watching this session! Another great session is AWS re:Inforce 2023 — Fine-grained authorization for apps with Amazon Verified Permissions (IAM308).
Continue reading: Part 3 — Integration with Amazon Cognito
–